







Showing posts with label Pay to Use. Show all posts
Showing posts with label Pay to Use. Show all posts
Sunday, November 24, 2013

Artwork of Irmino Pin-oops Purchased at SATC
You can visit his site here
PTU scrapkit Summertime by Purple Dreams Scraps
Mask of Choice, I am using one from the Misfits Creations
New Transparent Raster Layer 700x700
open frame1 copy and paste as new layer
place in the center
open paper9 copy and paste as new layer
Move below the frame and erase all parts on the outside
add a drop shadow to the frame
Open mask of choice. I am using mask06 by from the Misfits Creations
Open paper6 or paper of choice copy and paste as new layer
move below all other layers
Go to layers, new mask layer, from image select mask from dropdwon
Hit ok, Merger group
Open your tube copy and paste as new layer
Move above all other layers
resize down 2 times 1 by 80% and again by 95%
open the sand copy and paste as new layer
resize down 1 time by 95% and again by 90 %
Move below the tube layer
Open palmtree copy and paste as new layer
resize down as desired and move to the left below the sand
open the beach bag copy and paste as new layer
resize down 3 times by 80%
Move to the left
below the tube layer
Open the beachdrinks copy and paste as new layer
resize down 3 times by 80% and move to the
right above all other layers
Open the starfishs copy and paste as new layer
resize down 2 times by 80% and move to the right above all other layers
Add name copyright and save
PTU scrapkit Summertime by Purple Dreams Scraps
Mask of Choice, I am using one from the Misfits Creations
New Transparent Raster Layer 700x700
open frame1 copy and paste as new layer
place in the center
open paper9 copy and paste as new layer
Move below the frame and erase all parts on the outside
add a drop shadow to the frame
Open mask of choice. I am using mask06 by from the Misfits Creations
Open paper6 or paper of choice copy and paste as new layer
move below all other layers
Go to layers, new mask layer, from image select mask from dropdwon
Hit ok, Merger group
Open your tube copy and paste as new layer
Move above all other layers
resize down 2 times 1 by 80% and again by 95%
open the sand copy and paste as new layer
resize down 1 time by 95% and again by 90 %
Move below the tube layer
Open palmtree copy and paste as new layer
resize down as desired and move to the left below the sand
open the beach bag copy and paste as new layer
resize down 3 times by 80%
Move to the left
below the tube layer
Open the beachdrinks copy and paste as new layer
resize down 3 times by 80% and move to the
right above all other layers
Open the starfishs copy and paste as new layer
resize down 2 times by 80% and move to the right above all other layers
Add name copyright and save

Friday, November 15, 2013

Artwork of VeryMany, do not use without a proper license to do so
PTU Scrap kit I Love Candy by Wicked Princess
PTU Scrap kit I Love Candy by Wicked Princess
You can purchase only at The PSP Project
Mask of Choice. I am using one from the Creative Misfits Blog
New transparent raster layer 700x700
Open frame 4 copy and paste as new layer
resize down by 80% 1 time place in the center
open paper 3 copy and paste as new layer
move below the frame and erase all parts on the outside
add a drop shadow to desired
Open your tube copy and paste as new layer
Place as desired in one section of the frame
erase all parts on the outside
repeat with the other 2 sections of the frame
merge all 3 together
add a Xero radiance with desired settings
Open paper of choice i am using paper 9
Copy and paste as new layer
Move below all other layers
Go to layers, New mask layer from image
select from dropdown hit ok. Merge group
open the tube again copy and paste as new layer
resize down as desired
Move above all other layers to the center right
open ribbon 1 copy and paste as new layer
resize down 1 time by 80%
Move to the bottom below the tube layer
open the tablet copy and paste as new layer
resize down 5 times by 80%
Mirror and move to the right below the ribbon
open the puppy copy and paste as new layer
resize down by 80% to desired.
place to the left above all other layers
open the camera copy and paste as new layer
resize down by 80% about 4 times
Move to the left below the dog
open glasses2 copy and paste as new layer
resize down by 80% to desired. move to the right behind the dog
open the polish copy and paste as new layer
resize down 3 times by 80% and move to the left
below the camera
open the lipstick copy and paste as new layer
resize down 4 times by 80%
move to the left above the polish but to the right of the polish
add name copyright and save
Mask of Choice. I am using one from the Creative Misfits Blog
New transparent raster layer 700x700
Open frame 4 copy and paste as new layer
resize down by 80% 1 time place in the center
open paper 3 copy and paste as new layer
move below the frame and erase all parts on the outside
add a drop shadow to desired
Open your tube copy and paste as new layer
Place as desired in one section of the frame
erase all parts on the outside
repeat with the other 2 sections of the frame
merge all 3 together
add a Xero radiance with desired settings
Open paper of choice i am using paper 9
Copy and paste as new layer
Move below all other layers
Go to layers, New mask layer from image
select from dropdown hit ok. Merge group
open the tube again copy and paste as new layer
resize down as desired
Move above all other layers to the center right
open ribbon 1 copy and paste as new layer
resize down 1 time by 80%
Move to the bottom below the tube layer
open the tablet copy and paste as new layer
resize down 5 times by 80%
Mirror and move to the right below the ribbon
open the puppy copy and paste as new layer
resize down by 80% to desired.
place to the left above all other layers
open the camera copy and paste as new layer
resize down by 80% about 4 times
Move to the left below the dog
open glasses2 copy and paste as new layer
resize down by 80% to desired. move to the right behind the dog
open the polish copy and paste as new layer
resize down 3 times by 80% and move to the left
below the camera
open the lipstick copy and paste as new layer
resize down 4 times by 80%
move to the left above the polish but to the right of the polish
add name copyright and save
Wednesday, November 6, 2013

Artwork by Alicia Mujica. Visit her blog for purchasing and license information.
Beautiful PTU scrapkit "XtenZively Cutie" by Hungry Hill
You can purchase this kit at Mystical Scraps
New Transparent Raster Layer 700x700
frame 2 copy and paste as new layer
resize down 2 times by 80%
paper 2 move below frame erase all parts on the outside
OPEN YOUR tube copy and paste as new layer
resize down as desired and place below the frame
Duplicate place as desired move below the origional tube layer and merge down
Open tube again copy and paste as new layer
resize down as desired and place in the center
Duplicate frame layer and move above tube layer
Erase parts covering the top of the tube
open paperflutterby copy and paste as new layer
Resize down 3 times bt 50% and move to the top right above all other layers
open the luggage copy and paste as new layer
resize down 2 times by 50% and move above all other layers
to the bottom left
open eyeshadow copy and paste as new layer
resize down 2 times by 50 % Move to the right above the luggage
open the lipstick copy and paste as new layer
resize down 2 times by 50% Move to the left below the eyeshadows
open the notecard copy and paste as new layer
resize down 2 times by 50% move to the right below the eyeshadow
open mascara copy and paste as new layer
resize down 2 times by 50% and move above all other layers to the right
open nailpolish copy and paste as new layer
resize down 2 times by 50%
Move below the lipstick and to the right
ribbon 2 copy and paste as new layer
resize down 2 times by 50%
move to the top left corner of the notecard
Add name copyright and save
New Transparent Raster Layer 700x700
frame 2 copy and paste as new layer
resize down 2 times by 80%
paper 2 move below frame erase all parts on the outside
OPEN YOUR tube copy and paste as new layer
resize down as desired and place below the frame
Duplicate place as desired move below the origional tube layer and merge down
Open tube again copy and paste as new layer
resize down as desired and place in the center
Duplicate frame layer and move above tube layer
Erase parts covering the top of the tube
open paperflutterby copy and paste as new layer
Resize down 3 times bt 50% and move to the top right above all other layers
open the luggage copy and paste as new layer
resize down 2 times by 50% and move above all other layers
to the bottom left
open eyeshadow copy and paste as new layer
resize down 2 times by 50 % Move to the right above the luggage
open the lipstick copy and paste as new layer
resize down 2 times by 50% Move to the left below the eyeshadows
open the notecard copy and paste as new layer
resize down 2 times by 50% move to the right below the eyeshadow
open mascara copy and paste as new layer
resize down 2 times by 50% and move above all other layers to the right
open nailpolish copy and paste as new layer
resize down 2 times by 50%
Move below the lipstick and to the right
ribbon 2 copy and paste as new layer
resize down 2 times by 50%
move to the top left corner of the notecard
Add name copyright and save
Wednesday, October 9, 2013

Artwork by Alex Prihodko, you can purchase at Pics for Design
Beautiful PTU Scrap kit "Bubblegum Kisses" by Starz Creationz
Beautiful PTU Scrap kit "Bubblegum Kisses" by Starz Creationz
Please visit her blog for a complete list of store she sells in
New Transparent layer 700x700
Open frame 3 copy and paste as new layer
Free rotate to the right by 90%
Open paper 3 copy and paste as new layer
resize down 1 time by 80%
Move below frame 3 and erase all on the outside
Open your tube copy and paste as new layer
Resize down 3 times by 80%
Move below the frame layer and erase all on the outside
Open frame 4, Size up by 110% 3 times
Move below frame 3
Open your tube again copy and paste as new layer
Move above all other layers
Mirror
Resize down 1 time by 60% and again by 90%
Duplicate both frame layers and move above the tube layer
Erase parts of the tube on the outside of the frame
Now erase parts of both frames covering the top of the tube
Open element 10 copy and paste as new layer
duplicate, Merge down, and move to the bottom above all other layers
Open element 50 copy and paste as new layer
Move below element 10 and to the bottom
open element 20 copy and paste as new layer
Move to the left above all other layers
open element 8 copy and paste as new layer
Move above all other layers
resize down 2 times by 90%
Mirror and move to the right
open element 3 copy and paste as new layer
Move below all other layers
open element 53 copy and paste as new layer
resize down 3 times by 90%
Mirror and move to the right below the rabbit
open element 25 copy and paste as new layer
Move below the cat and rabbit placing center bottom
add name copyright and save
Saturday, October 5, 2013

Artwork by Zlata M , you can purchase from Pics for Design
Beautiful PTU Scrap kit "Remember Me" RissaSDesigns
Please visit her blog for a complete list of stores she sells in
New Transparent Raster Layer 700x700
Open frame 5 copy and paste as new layer
Mirror and move slightly off center right
open paper 6 copy and paste as new layer
Resize down 2 times by 80% and move below frame layer
erase all parts on the outside
open the tube layer copy and paste as new layer
Move below the frame
erase all parts on the outside
add a black and white film
open star scatter copy and paste as new layer
move below all other layers
Open flower 2 copy and paste as new layer
resize down 1 time by 80%
move to the left above all other layers
Open the following elements
Perfume
Purse
Lipstick2
Diary
Winged clock
Copy and paste the Perfume to the Diary as name layer
Resize and place to the left above all other layers as desired
Open Winged Clock copy and paste as new layer
resize down as deisred and move to the top left
above all other layers
add name copyright and save
Monday, September 30, 2013

Beautiful PTU scrapkit is by Irish Princess Designs "Madnes"
You can purchase from Sweet Pinups Store
Artwork of Jose Cano , purchase at SATC
Mask of choice
New Transparent Raster Layer 700x700
open frame 2 copy and paste as new layer
resize down 2 times by 80% placing in the center
open paper 2 copy and paste as new layer
Move below frame and resize down 2 times by 80%
Erase all parts on the outside
open paper 12 copy and paste as new layer
Move below all other layers
Open your mask. I am using sparkle mask 5 from sue
Mask of choice
New Transparent Raster Layer 700x700
open frame 2 copy and paste as new layer
resize down 2 times by 80% placing in the center
open paper 2 copy and paste as new layer
Move below frame and resize down 2 times by 80%
Erase all parts on the outside
open paper 12 copy and paste as new layer
Move below all other layers
Open your mask. I am using sparkle mask 5 from sue
Downloaded from the Creative Misfits Creations Blog
Go to layer, new mask layer from image
select from dropdown, hit ok
merge group and resize down 2 times by 90%
Open the floor copy and paste as new layer
Move below the frame layer
open cards 1 copy and paste as new layer
move below the floor and centered
open close up tube layer copy and paste as new layer
resize down as desired mirror and move to the far right
Place behind frame and erase all on the outside.
Add a luminance legacy
Open full tube layer copy and paste as new layer
resixze down as desired and move to the left above all other layers
open swirl and swirl 1 copy and paste as new layer
Resize down by 80%
Move swirl one to the right below full tube layer so its barely visible
Move swirl2 below the full tube layer to the left above swirl
open the books copy and paste as new layer
resize down as desired by 80% and move to the right above all layers
open the sugar bowl copy and paste as new layer
resize down as desired and place in the center
below the full tube layer
open the teapot copy and paste as new layer
resize down as desired, 1 time more than the sugar bowl
Place above the sugar bowl
Open the cake copy and paste as new layer
resize down 3 times by 80% and move above all other layers
above the right knee of the tube
open the cup copy and paste as new layer
resize down to desired
Move above all other layers and to the right
Add name copyright and save
Go to layer, new mask layer from image
select from dropdown, hit ok
merge group and resize down 2 times by 90%
Open the floor copy and paste as new layer
Move below the frame layer
open cards 1 copy and paste as new layer
move below the floor and centered
open close up tube layer copy and paste as new layer
resize down as desired mirror and move to the far right
Place behind frame and erase all on the outside.
Add a luminance legacy
Open full tube layer copy and paste as new layer
resixze down as desired and move to the left above all other layers
open swirl and swirl 1 copy and paste as new layer
Resize down by 80%
Move swirl one to the right below full tube layer so its barely visible
Move swirl2 below the full tube layer to the left above swirl
open the books copy and paste as new layer
resize down as desired by 80% and move to the right above all layers
open the sugar bowl copy and paste as new layer
resize down as desired and place in the center
below the full tube layer
open the teapot copy and paste as new layer
resize down as desired, 1 time more than the sugar bowl
Place above the sugar bowl
Open the cake copy and paste as new layer
resize down 3 times by 80% and move above all other layers
above the right knee of the tube
open the cup copy and paste as new layer
resize down to desired
Move above all other layers and to the right
Add name copyright and save
Thursday, September 19, 2013
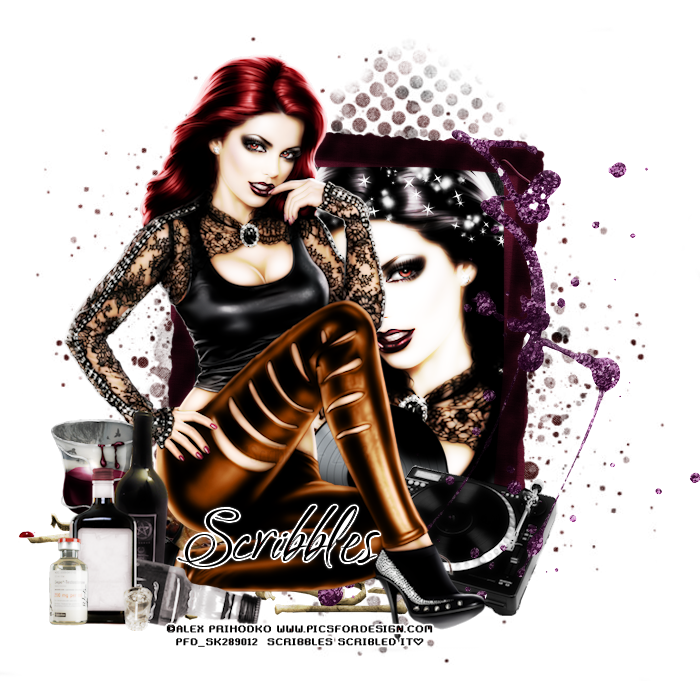
Scrap kit is the Beautiful Pay to use kit Trapped in Autumn Synkkä
It is part of the Trapped in Autumn Series
by Manipulated by Magik You can purchase at Pics for Design
Artwork is by Alex Prihodko, available at Pics for Design
by Manipulated by Magik You can purchase at Pics for Design
Artwork is by Alex Prihodko, available at Pics for Design
Sparklemask 5 by Sue download from the Creative Misfits Blog
New Transparent Rater Layer 700x700
Open frame 4 copy and paste as new layer
resize down by 80%
Open papers 5 and 6
copy and paste both as new layer
Move below the frame layer and paper 6 on top of paper 5
highlight paper 6, and erase all parts on the outside of the frame
Highlight paper 5
Open your mask
Go to Layer, New mask Layer from image
Select the mask from Dropdown and hit ok
Merge group and resize down 1 time by 90%
So it does not take up the entire backgound
Open the tube copy and paste as new layer
resize down 3 times by 90% and move below the frame
Erase all parts on the outside
Add a Xero : Radiance with the following settings
Open the full tube copy and paste as new layer
mirror and move to the left
Resize down about 4 times by 80%
Place as desired
Open the Turntable copy and paste as new layer
resize down 2 times by 80% and move to the right
below the full Tube layer
Open the viynl copy and paste as new layer
resize down 4 times by 80% and move below the turntable and to the left
I have it below her leg
Open the sparkles copy and paste as new layer
Move below the frame layer and to the top
Erase all parts on the outside
open the bones copy and paste as new layer
move to the left below the tube layer
sorta like she is sitting on it
Open the bleeding leaves
copy and paste as new layer
Move blow the tube layer
Kind of sitting on the bones
open the glitter splatter copy and paste as new layer
Move below the tube layer to the right
Grab the eraser and carefully erase the spots on the
Closeup tube layer
open the liquor copy and paste as new layer
Move above all other layers
Resize down 2 times by 80% and again by 90%
Move to the left above her foot
open the liquid drugs copy and paste as new layer
Resize down to desired and move to the left above the liquor
open the drink copy and paste as new layer
Resize down 2 times by 80%
Move below the liquor and to the left
Add name copyright and save
New Transparent Rater Layer 700x700
Open frame 4 copy and paste as new layer
resize down by 80%
Open papers 5 and 6
copy and paste both as new layer
Move below the frame layer and paper 6 on top of paper 5
highlight paper 6, and erase all parts on the outside of the frame
Highlight paper 5
Open your mask
Go to Layer, New mask Layer from image
Select the mask from Dropdown and hit ok
Merge group and resize down 1 time by 90%
So it does not take up the entire backgound
Open the tube copy and paste as new layer
resize down 3 times by 90% and move below the frame
Erase all parts on the outside
Add a Xero : Radiance with the following settings
Open the full tube copy and paste as new layer
mirror and move to the left
Resize down about 4 times by 80%
Place as desired
Open the Turntable copy and paste as new layer
resize down 2 times by 80% and move to the right
below the full Tube layer
Open the viynl copy and paste as new layer
resize down 4 times by 80% and move below the turntable and to the left
I have it below her leg
Open the sparkles copy and paste as new layer
Move below the frame layer and to the top
Erase all parts on the outside
open the bones copy and paste as new layer
move to the left below the tube layer
sorta like she is sitting on it
Open the bleeding leaves
copy and paste as new layer
Move blow the tube layer
Kind of sitting on the bones
open the glitter splatter copy and paste as new layer
Move below the tube layer to the right
Grab the eraser and carefully erase the spots on the
Closeup tube layer
open the liquor copy and paste as new layer
Move above all other layers
Resize down 2 times by 80% and again by 90%
Move to the left above her foot
open the liquid drugs copy and paste as new layer
Resize down to desired and move to the left above the liquor
open the drink copy and paste as new layer
Resize down 2 times by 80%
Move below the liquor and to the left
Add name copyright and save
Saturday, September 14, 2013

Artwork of Zlata M, you can purchase at Pics for Design
Scrap Kit by Starz Creationz "Punkie Emo" Available from Sweet Pinups Store
New Transparent Raster Layer 700x700
open frame 1 copy and paste as new layer
Resize down 1 time by 80% and move to the center
open paper 5 copy and paste as new layer
Move below the frame erase all parts on the outside
open your tube copy and paste as new layer
resize down 2 times by 80% and move to the right above all
other layers
open element 7 copy and paste as new layer
resize down 2 times by 80%
Free rotate to th left by 38% and move below th tube layer
to the left
element 9 copy and paste as new layer
resize down by 80% 4 times
Move to the right right above frame layer
element 16 copy and paste as new layer
resize down 3 times by 80%
move to the right above element 9
element 39 copy and paste as new layer
Move to the right directly below tube layer
element 29 copy and paste as new layer
Move below all other layers to the center
element 3 copy and paste as new layer
resize down 2 times by 60%
Move above all other layers to the left
open element 1 copy and paste as new layer
resize down 2 times by 60% and move the the left behind the cat
add name copyright and save
New Transparent Raster Layer 700x700
open frame 1 copy and paste as new layer
Resize down 1 time by 80% and move to the center
open paper 5 copy and paste as new layer
Move below the frame erase all parts on the outside
open your tube copy and paste as new layer
resize down 2 times by 80% and move to the right above all
other layers
open element 7 copy and paste as new layer
resize down 2 times by 80%
Free rotate to th left by 38% and move below th tube layer
to the left
element 9 copy and paste as new layer
resize down by 80% 4 times
Move to the right right above frame layer
element 16 copy and paste as new layer
resize down 3 times by 80%
move to the right above element 9
element 39 copy and paste as new layer
Move to the right directly below tube layer
element 29 copy and paste as new layer
Move below all other layers to the center
element 3 copy and paste as new layer
resize down 2 times by 60%
Move above all other layers to the left
open element 1 copy and paste as new layer
resize down 2 times by 60% and move the the left behind the cat
add name copyright and save
Sunday, September 8, 2013

Artwork by Alex Prihodko , Purchased at Pics for Design
Beautiful PTU Kit "Autumn Festival" by Manipulated by Magik
Purchased at Mystical Scraps
Mask is by Vix
New Transparent Raster Layer 700x700
Open Frame 1 copy and paste as new layer
resize down 1 time by 80%
place in the center
open leaf ring copy and paste as new layer
Move below the frame layer to the center
Open paper 1 copy and paste as new layer
Move below all other layers
erase all parts on the outside
Open paper 2 copy and paste as new layer
Move below all other layers
go to layer
new mask layer from image
select from drop down hot ok
Merge group
open your tube copy and paste as new layer
resize down by 80% and place in the frame
erase all parts on the outside
open the tube again copy and paste as new layer
Move above all other layer, Mirror and move to the left
Resize down as deisred by 80% about 4 times
open the Sign copy and paste as new layer
resize down by 80% 2 times
Move to the right below the foot of the tube
open the wordart copy and paste as new layer
resize down to desired and move to the bottom right
Above all other layers
duplicate and move below the sign
Erase parts covering the sign
but leave the wordart over the tube
open the border copy and paste as new layer
Move below the full tube layer and sign
I have it to where it looks like she is sitting on it
and the cat is peaking out from behind her legs
Open the sparkle and leaves copy and paste as new layer
Move to the bottom below the frame layer
erase all excess on the outside
open the swirl copy and paste as new layer
Move to the bottom below all other layers
duplicate and move below the tube layer
Erase all excess that is above the elements and on the bottom on the tube
Purchased at Mystical Scraps
Mask is by Vix
New Transparent Raster Layer 700x700
Open Frame 1 copy and paste as new layer
resize down 1 time by 80%
place in the center
open leaf ring copy and paste as new layer
Move below the frame layer to the center
Open paper 1 copy and paste as new layer
Move below all other layers
erase all parts on the outside
Open paper 2 copy and paste as new layer
Move below all other layers
go to layer
new mask layer from image
select from drop down hot ok
Merge group
open your tube copy and paste as new layer
resize down by 80% and place in the frame
erase all parts on the outside
open the tube again copy and paste as new layer
Move above all other layer, Mirror and move to the left
Resize down as deisred by 80% about 4 times
open the Sign copy and paste as new layer
resize down by 80% 2 times
Move to the right below the foot of the tube
open the wordart copy and paste as new layer
resize down to desired and move to the bottom right
Above all other layers
duplicate and move below the sign
Erase parts covering the sign
but leave the wordart over the tube
open the border copy and paste as new layer
Move below the full tube layer and sign
I have it to where it looks like she is sitting on it
and the cat is peaking out from behind her legs
Open the sparkle and leaves copy and paste as new layer
Move to the bottom below the frame layer
erase all excess on the outside
open the swirl copy and paste as new layer
Move to the bottom below all other layers
duplicate and move below the tube layer
Erase all excess that is above the elements and on the bottom on the tube
On both Leave what is over the sign
Open the Bokah Scatter Copy and paste as new layer
Move below all element layers and up near the center
I have it to where its Mixed with the leaves and sparkle
Add name copyright and save
Open the Bokah Scatter Copy and paste as new layer
Move below all element layers and up near the center
I have it to where its Mixed with the leaves and sparkle
Add name copyright and save
Saturday, September 7, 2013

Artwork is by Sweet Pinups
Match Kit Lana Love by Kissing Kate
Mask of Choice i am using one from the Misfits Blog
New Transparent Raster Layer 700x700
Open paper 4 copy and paste as new layer
Go to layer new mask layer
from image select from Drop down Hit Ok
Merge group, and reszie down 1 time by 90%
Open frame 2 copy and paste as new layer
resize down 1 time by 80% and place in the center
Open paper 2 copy and paste as new layer
Move below the frame
erase all parts on the outside
Open your tube copy and paste as new layer
resize as desired, move to the left below the frame
erase all parts on the outside
Add a Xero - Radiance with the following Settings
Open element 26 copy and paste as new layer
resize down 1 time by 80% and move to the bottom
above all other layers
Open the full Tube copy and paste as new layer
Resize down as desired and move to the right
above all other layers like she is standing on element 26
Open element 19 copy and paste as new layer
resize down by 80% 2 times and move to the right
below the tube layer
Open element 14 copy and paste as new layer
Resize down 1 time by 70%, Mirror and move to the left
above all other layers
open element 40 copy and paste as new layer
resize down 2 times by 70% and again by 80%
Move to the left above all other layers like he has 1 paw off
element 26
Open element 36 copy and paste as new layer
resize down by 80% 3 times
Mirror and move to the left
below th tube layer
i have it centered between the kitty and tube
Open element 39 copy and paste as new layer
Move below the frame layer
Erase all on the outside
add name copyright and save
Match Kit Lana Love by Kissing Kate
Mask of Choice i am using one from the Misfits Blog
New Transparent Raster Layer 700x700
Open paper 4 copy and paste as new layer
Go to layer new mask layer
from image select from Drop down Hit Ok
Merge group, and reszie down 1 time by 90%
Open frame 2 copy and paste as new layer
resize down 1 time by 80% and place in the center
Open paper 2 copy and paste as new layer
Move below the frame
erase all parts on the outside
Open your tube copy and paste as new layer
resize as desired, move to the left below the frame
erase all parts on the outside
Add a Xero - Radiance with the following Settings
Open element 26 copy and paste as new layer
resize down 1 time by 80% and move to the bottom
above all other layers
Open the full Tube copy and paste as new layer
Resize down as desired and move to the right
above all other layers like she is standing on element 26
Open element 19 copy and paste as new layer
resize down by 80% 2 times and move to the right
below the tube layer
Open element 14 copy and paste as new layer
Resize down 1 time by 70%, Mirror and move to the left
above all other layers
open element 40 copy and paste as new layer
resize down 2 times by 70% and again by 80%
Move to the left above all other layers like he has 1 paw off
element 26
Open element 36 copy and paste as new layer
resize down by 80% 3 times
Mirror and move to the left
below th tube layer
i have it centered between the kitty and tube
Open element 39 copy and paste as new layer
Move below the frame layer
Erase all on the outside
add name copyright and save
Thursday, September 5, 2013

Artwork by Arthur Crowe
Matching Scrapkit Sexy Sweater by RissaSDesigns
Purchase both from his Store. ( linked above)
Mask 349 and 03 by Vix
New transparent raster layer 700x700
Open paper 8 copy and paste as new layer
go to layer, new mask layer from image
select from drop down hit OK
Merge group and resize down by 80%
Repeat with paper 11
Resize up by 110%
Open element 8 copy and paste as new layer
Resize down 1 time by 80% and again by 90%
Free rotate to the left by 45%
open paper 5 move below element 8
Erase all parts on the outside
Open your closeup tube copy and paste as new layer
move below the frame
resize down 2 times by 80% and move to the right
erase all parts on the outside
Add a Xero: Radiance with the following settings
Mask 349 and 03 by Vix
New transparent raster layer 700x700
Open paper 8 copy and paste as new layer
go to layer, new mask layer from image
select from drop down hit OK
Merge group and resize down by 80%
Repeat with paper 11
Resize up by 110%
Open element 8 copy and paste as new layer
Resize down 1 time by 80% and again by 90%
Free rotate to the left by 45%
open paper 5 move below element 8
Erase all parts on the outside
Open your closeup tube copy and paste as new layer
move below the frame
resize down 2 times by 80% and move to the right
erase all parts on the outside
Add a Xero: Radiance with the following settings

open the full tube layer copy and paste as new layer
Resize down 2 times by 80% and move to the left above all other layers
open element 13 copy and paste as new layer
resize down 3 times by 80% and mirror
Move to the left below the tube
open element 4 copy and paste as new layer
Resize down 2 times by 80% and move to the right below the tube layer
Open element 30 copy and paste as new layer
resize down 3 times by 80% and move to the right above all other layers
Open element 22 copy and paste as new layer
resize down 4 times by 80% and move to the right below element 30
open element 7 copy and paste as new layer
resize down 4 times by 80% and move above all layers
to the center ( behind the fox tail)
Merge Visible and add a
Xero add a radiance with the following Settings

Add name copyright and save
Thursday, August 29, 2013

Happily Ever After PTU by Kising Kate Purchase at Sweet Pinups
Art work of Barbara Jensen
Mask of Choice i am using one from the Creative Misfits
New Transparent Raster Layer 700x700
Open frame 3 copy and paste as new layer
resize down 1 time by 80% and free rotate to the left by 90%
Open paper 3 copy and paste as new layer
Move below the frame layer and erase all parts on the outside
Open paper 2 copy and paste as new layer
Open your mask
Move below all other layers
Go to Layer, New Mask Layer from image
Select from Drop down and hit ok
Merge Group
Open your close up tube layer
copy and paste as new layer
Move below the frame layer to the right and erase all parts on the outside
Add a Luminance
Open full tube layer copy and paste as new layer
Move to the left above the frame layer
Duplicate Frame and move above the Tube
Erase the parts of the tube on the bottom outside of the tube
Now highlight the duplicated frame layer and erase parts
covering the tube
open element 47 copy and paste as new layer
Move below the original frame layer and to the bottom Right
erase all on the outside
open element 35 copy and paste as new layer
Move above all other layers and to the bottom
resize down 2 times by 80%
Open element 33 copy and paste as new layer
resize down 3 times by 60% and move to the bottom Right above all
other layers
open element 15 copy and paste as new layer
resize down 3 times by 60% and move to the bottom Left
open element 14 copy and paste as new layer
resize down 2 times by 60% and again by 80% 1 time
Move above element 15 on the bottom left
open element 24 copy and paste as new layer
resize down by 80% about 6 times
Move to the right below the jewel
open element 13 copy and paste as new layer
resize down 2 times by 60%
Move above all other layers
the heel on the top of the mask
open element 12 copy and paste as new layer
resize down 2 times by 60%
move to the left below the slipper
Open Element 44 copy and paste as new layer
Move above all other layers and to the right of the book
add name copyright and save
Art work of Barbara Jensen
Mask of Choice i am using one from the Creative Misfits
New Transparent Raster Layer 700x700
Open frame 3 copy and paste as new layer
resize down 1 time by 80% and free rotate to the left by 90%
Open paper 3 copy and paste as new layer
Move below the frame layer and erase all parts on the outside
Open paper 2 copy and paste as new layer
Open your mask
Move below all other layers
Go to Layer, New Mask Layer from image
Select from Drop down and hit ok
Merge Group
Open your close up tube layer
copy and paste as new layer
Move below the frame layer to the right and erase all parts on the outside
Add a Luminance
Open full tube layer copy and paste as new layer
Move to the left above the frame layer
Duplicate Frame and move above the Tube
Erase the parts of the tube on the bottom outside of the tube
Now highlight the duplicated frame layer and erase parts
covering the tube
open element 47 copy and paste as new layer
Move below the original frame layer and to the bottom Right
erase all on the outside
open element 35 copy and paste as new layer
Move above all other layers and to the bottom
resize down 2 times by 80%
Open element 33 copy and paste as new layer
resize down 3 times by 60% and move to the bottom Right above all
other layers
open element 15 copy and paste as new layer
resize down 3 times by 60% and move to the bottom Left
open element 14 copy and paste as new layer
resize down 2 times by 60% and again by 80% 1 time
Move above element 15 on the bottom left
open element 24 copy and paste as new layer
resize down by 80% about 6 times
Move to the right below the jewel
open element 13 copy and paste as new layer
resize down 2 times by 60%
Move above all other layers
the heel on the top of the mask
open element 12 copy and paste as new layer
resize down 2 times by 60%
move to the left below the slipper
Open Element 44 copy and paste as new layer
Move above all other layers and to the right of the book
add name copyright and save
Tuesday, August 27, 2013


You can purchase both from His store HERE
Mask is from the Creative Misfits
You can use Mask of choice
New Transpart Raster Layer 700x700
Open paper 3 copy and paste as new layer
Make sure your mask is open
Go to Layer, New Mask Layer From Image
Select from DropDown and hit ok
Merge Group
Resize down 1 time by 90%
Open frame 1 copy and paste as new layer
Resize down 2 times by 80%
Free rotate to the right by 45
Place in the center
Open paper 5 copy and paste as new layer
Move below the frame and erase all parts on the outside
Open your tube layer copy and paste as new layer
Place as desired below tube
Duplicate and move as desired ad merge down.
I have mine to where her face is on the left and chest on the right
Erase all parts on the outside.
add a luminance Legacy
Open tube again copy and paste as new layer
Move above all other layers
Resize down 1 time by 50% and again by 90%
Move to where the bottom of the left foot is at the bottom
corner of the frame
Open the sparkles copy and paste as new layer
Move directly below the frame layer
erase all parts on the outside
Open the toolbox copy and paste as new layer
Move directly above the frame layer
resize down 5 times by 80% Placing on the corner of the frame
open the boombox copy and paste as new layer
Resize down 2 times by 60% and move to the left above the toolbox
open the wrench copy and paste as new layer
Resize down 1 time by 60% and move to the right below the toolbox
open the screwdriver copy and paste as new layer
Resize down 2 times by 60%
Move to the right below the wrench
open the sunglasses copy and paste as new layer
resize down 2 times by 60% and move directly below the tube layer and to the center
open ribbon2 copy and paste as new layer
resize down by 60% 1 time and move directly above the frame
add name copyright and save
Mask is from the Creative Misfits
You can use Mask of choice
New Transpart Raster Layer 700x700
Open paper 3 copy and paste as new layer
Make sure your mask is open
Go to Layer, New Mask Layer From Image
Select from DropDown and hit ok
Merge Group
Resize down 1 time by 90%
Open frame 1 copy and paste as new layer
Resize down 2 times by 80%
Free rotate to the right by 45
Place in the center
Open paper 5 copy and paste as new layer
Move below the frame and erase all parts on the outside
Open your tube layer copy and paste as new layer
Place as desired below tube
Duplicate and move as desired ad merge down.
I have mine to where her face is on the left and chest on the right
Erase all parts on the outside.
add a luminance Legacy
Open tube again copy and paste as new layer
Move above all other layers
Resize down 1 time by 50% and again by 90%
Move to where the bottom of the left foot is at the bottom
corner of the frame
Open the sparkles copy and paste as new layer
Move directly below the frame layer
erase all parts on the outside
Open the toolbox copy and paste as new layer
Move directly above the frame layer
resize down 5 times by 80% Placing on the corner of the frame
open the boombox copy and paste as new layer
Resize down 2 times by 60% and move to the left above the toolbox
open the wrench copy and paste as new layer
Resize down 1 time by 60% and move to the right below the toolbox
open the screwdriver copy and paste as new layer
Resize down 2 times by 60%
Move to the right below the wrench
open the sunglasses copy and paste as new layer
resize down 2 times by 60% and move directly below the tube layer and to the center
open ribbon2 copy and paste as new layer
resize down by 60% 1 time and move directly above the frame
add name copyright and save
Thursday, August 22, 2013
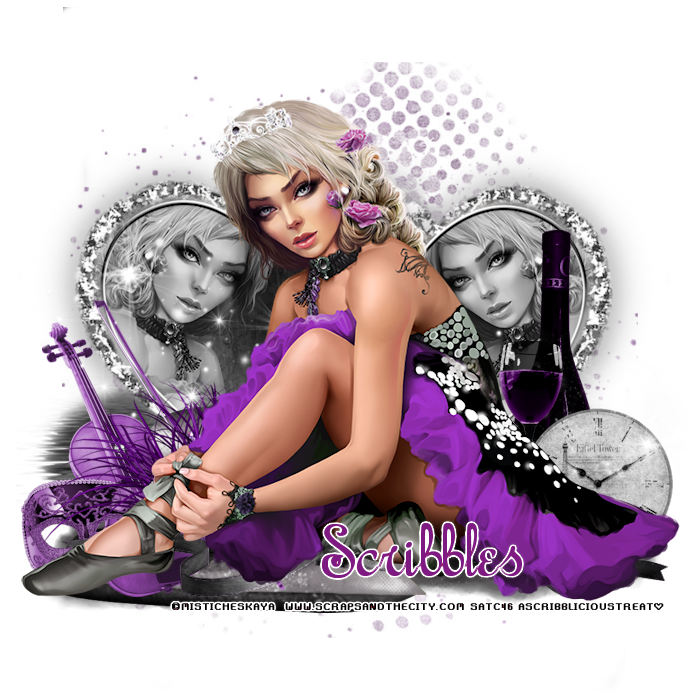
Artwork by Misticheskaya
Matching PTU ScrapKit "Helen" by Disturbed Scraps by Gaby
Both available at Scraps and The City
Both available at Scraps and The City
Mask is Sparkle mask 5 by Sue , available from
the Creative Misfits blog
New Transparent Raster Layer 700x700
Open element 138 copy and paste as new layer
resize down 2 times by 80% place in the center
Open paper 8 copy and paste as new layer
Move below Frame layer
erase all parts on the outside
Open paper 9 copy and paste as new layer
move below paper 8
Open your mask
go to layer, new mask layer
from image select from drop down
Hit ok, Merge group
Hide this layer
Open tube copy and paste as new layer
move below frame layer and place as desired
Erase all parts on the outside Merge down,
Resize down 1 time again by 90% an mirror, Move
to the left duplicate, Mirror and move to the rightt
Erase the part of the right covering the left
Open full tube layer copy and paste as new layer
Resize down 1 time by 90% and move above all other layers
Unhide the mask layer
open element 38 copy and paste as new layer
resize down 1 time by 80% and again by 90%
Move directly above the mask layer
open element 35 copy and paste as new layer
resize down by 80% 2 times and move above all other layers
open tube layer again copy and paste as new layer
resize down 1 time by 80%
Move to the center above all other layers
open element 57 copy and paste as new layer
resize down 1 time by 70%
Move to the left below the tube layer
Open element 30 copy and paste as new layer
resize down by 70% 2 times and move to the right below the tube layer
open element 122 copy and paste as new layer
Resize down 2 times by 90% and move below the tube layer
Open element 12 copy and paste as new layer
Move below the frame layer
resize down 1 time by 90%
open element 101 copy and paste as new layer
resize down 1 time by 60% and move to the right below the clock
open element 102 copy and paste as new layer
resize down 2 times by 60% and move to the right above the sparkle layer
to the left of the wine bottle
open element 29 copy and paste as new layer
resize down 2 times by 60% and move to the left
below the foot of the tube layer
open element 106 copy and paste as new layer
resize down 1 time by 60%
Mirror and move to the left below element 57
open element 85 copy and paste as new layer
resize down by 60% and move to the left directly below
element 57
add name copyright and save
New Transparent Raster Layer 700x700
Open element 138 copy and paste as new layer
resize down 2 times by 80% place in the center
Open paper 8 copy and paste as new layer
Move below Frame layer
erase all parts on the outside
Open paper 9 copy and paste as new layer
move below paper 8
Open your mask
go to layer, new mask layer
from image select from drop down
Hit ok, Merge group
Hide this layer
Open tube copy and paste as new layer
move below frame layer and place as desired
Erase all parts on the outside Merge down,
Resize down 1 time again by 90% an mirror, Move
to the left duplicate, Mirror and move to the rightt
Erase the part of the right covering the left
Open full tube layer copy and paste as new layer
Resize down 1 time by 90% and move above all other layers
Unhide the mask layer
open element 38 copy and paste as new layer
resize down 1 time by 80% and again by 90%
Move directly above the mask layer
open element 35 copy and paste as new layer
resize down by 80% 2 times and move above all other layers
open tube layer again copy and paste as new layer
resize down 1 time by 80%
Move to the center above all other layers
open element 57 copy and paste as new layer
resize down 1 time by 70%
Move to the left below the tube layer
Open element 30 copy and paste as new layer
resize down by 70% 2 times and move to the right below the tube layer
open element 122 copy and paste as new layer
Resize down 2 times by 90% and move below the tube layer
Open element 12 copy and paste as new layer
Move below the frame layer
resize down 1 time by 90%
open element 101 copy and paste as new layer
resize down 1 time by 60% and move to the right below the clock
open element 102 copy and paste as new layer
resize down 2 times by 60% and move to the right above the sparkle layer
to the left of the wine bottle
open element 29 copy and paste as new layer
resize down 2 times by 60% and move to the left
below the foot of the tube layer
open element 106 copy and paste as new layer
resize down 1 time by 60%
Mirror and move to the left below element 57
open element 85 copy and paste as new layer
resize down by 60% and move to the left directly below
element 57
add name copyright and save
Tuesday, July 30, 2013

Artwork on Ninaste
PTU Scrap Kit from Bibi's Collection City of angels
New Transparent Raster Layer 700X700
open paper 2 copy and paste as new layer
open element 15 copy and paste as new layer
Place in the center above the paper
erase all parts of the paper on the outside
open your full tube layer, copy and paste as new layer
resize down by 80% 1 time, move below element 15
Erase all parts on the outside and add a luminance legacy
Merge the frame, paper and tube layer and move to the right just a little
open the full tube again copy and paste as new layer
resize down 2 times by 80% and Mirror, Move to the left
open element 74 copy and paste as new layer
resize down 1 time by 80% and move below the full tube layer
to the bottom
Open element 91 copy and paste as new layer
resize down 2 times by 80% and move below element 74
open element 47 copy and paste as new layer
Move above all other layers and to the right
covering the right foot
open element 48 copy and paste as new layer
Move to the right center below element 74
open element 28 copy and paste as new layer
move below all other layers and resize down 4 times 80%
open element 23 copy and paste as new layer
resize down by 80% 1 time and move below full tube layer
And to the left
open element 16 copy and paste as new layer
Move to the top right above all other layers
resize down by 80% about 3 times
Place at the top of the frame and to the right
add name copyright and save
PTU Scrap Kit from Bibi's Collection City of angels
New Transparent Raster Layer 700X700
open paper 2 copy and paste as new layer
open element 15 copy and paste as new layer
Place in the center above the paper
erase all parts of the paper on the outside
open your full tube layer, copy and paste as new layer
resize down by 80% 1 time, move below element 15
Erase all parts on the outside and add a luminance legacy
Merge the frame, paper and tube layer and move to the right just a little
open the full tube again copy and paste as new layer
resize down 2 times by 80% and Mirror, Move to the left
open element 74 copy and paste as new layer
resize down 1 time by 80% and move below the full tube layer
to the bottom
Open element 91 copy and paste as new layer
resize down 2 times by 80% and move below element 74
open element 47 copy and paste as new layer
Move above all other layers and to the right
covering the right foot
open element 48 copy and paste as new layer
Move to the right center below element 74
open element 28 copy and paste as new layer
move below all other layers and resize down 4 times 80%
open element 23 copy and paste as new layer
resize down by 80% 1 time and move below full tube layer
And to the left
open element 16 copy and paste as new layer
Move to the top right above all other layers
resize down by 80% about 3 times
Place at the top of the frame and to the right
add name copyright and save
Wednesday, July 24, 2013

Art work of Arthur Crowe
Matching Kit Sencitive by Rissas Designs
Mask of choice I am using one from Weescotslass Creations
New transparent Raster layer 700x700
open paper 4 copy and paste as new layer
Go to Layer, New Mask Layer from Image, select from dropdown
hit ok
Merge Group
resize down 1 time by 80% and adjust to where it is centered
Open frame 1 copy and paste as new layer
Placing center above the mask layer
Open the City Scape copy and paste as new layer
move above all other layers and to the top a little
open the tube copy and paste as new layer
resize down 1 time by 80% and move to the bottom center above all other layers
Open the discoball copy and paste as new layer
Move above th cityscape and resize down 4 times by 80%
Move down to where it is below the tube and looks to where it is
at the botto of the cityscape
open the guitar copy and paste as new layer
resize down 1 time by 80% Free rotate to the left by 30
and move to the left below the tube layer
open musicnote2 copy and paste as new layer
resize down 2 times by 50% and place as desired
Duplicate as many times as u want and spread them around
repeat with Musicnote1
(you may need to resize alittle more)
open bow 2 copy and paste as new layer
resize down 2 times by 50% and move to the top
above all other layers
Placing in the center
open the flamepop copy and paste as new layer
resize down 1 time by 80% and move to the left
below the Guitar
Open the wire copy and paste as new layer
resize up by 120 %
Go to Layer, New mask layer from image
select from drop down click ok and merge group
Merge group and move below all other layers
Add name copyright and save as a PNG.

Matching Kit Sencitive by Rissas Designs
Mask of choice I am using one from Weescotslass Creations
New transparent Raster layer 700x700
open paper 4 copy and paste as new layer
Go to Layer, New Mask Layer from Image, select from dropdown
hit ok
Merge Group
resize down 1 time by 80% and adjust to where it is centered
Open frame 1 copy and paste as new layer
Placing center above the mask layer
Open the City Scape copy and paste as new layer
move above all other layers and to the top a little
open the tube copy and paste as new layer
resize down 1 time by 80% and move to the bottom center above all other layers
Open the discoball copy and paste as new layer
Move above th cityscape and resize down 4 times by 80%
Move down to where it is below the tube and looks to where it is
at the botto of the cityscape
open the guitar copy and paste as new layer
resize down 1 time by 80% Free rotate to the left by 30
and move to the left below the tube layer
open musicnote2 copy and paste as new layer
resize down 2 times by 50% and place as desired
Duplicate as many times as u want and spread them around
repeat with Musicnote1
(you may need to resize alittle more)
open bow 2 copy and paste as new layer
resize down 2 times by 50% and move to the top
above all other layers
Placing in the center
open the flamepop copy and paste as new layer
resize down 1 time by 80% and move to the left
below the Guitar
Open the wire copy and paste as new layer
resize up by 120 %
Go to Layer, New mask layer from image
select from drop down click ok and merge group
Merge group and move below all other layers
Add name copyright and save as a PNG.
Tuesday, July 23, 2013

art work of Mistichekaya, you can purchase at Pics For Design
PTU ScrapKit Garden Delight by Jennys Designz
you can purchase at Sweet Pinups
PTU ScrapKit Garden Delight by Jennys Designz
you can purchase at Sweet Pinups
New transparent Raster layer 700x700
frame 4 copy and paste as new later
resize 1 time by 90%
Free rotate to the left by 30
duplicate and mirror
open paper 4 copy and paste as new layer
move below the frame layer and erase all parts on the outside
open the tube copy and paste as new layer
Move above the paper layer
erase all parts on the outside of the frame
add a luminance
Open tube again
resize down 1 time by 80% and move above all other layers
open the sparkles copy and pasre as new layer
move below full tube layer
to the left, Duplicate and move to the right
open the basket copy and paste as new layer
resize down 2 times by 80%
Move to the right above the sparkles and below the full tube layer
duplicate and move to the left
open the butterflys copy and paste as new layer
Move above the frame layer
Erase all parts covering the tube
open cat2 copy and paste as new layer
resize down 3 times by 80% and Move to the left above all other layers
Open stones copy and paste as new layer
resize down 1 time by 80% and move directly above the sparkle layers
open flower2 copy and paste as new layer
resize down 2 times by 80% and move below the tube layer and to the right
Duplicate and move to the left
Open flower3 copy and paste as new layer
resize down by 80% as desired and move to the right above all other layers
add name copyright and save
Tuesday, July 16, 2013

Artwork of Jay Trembly, You can purchase from SATC Here
Pay to Use Scrap Kit Just Beachy by Bibi's Collection
Both can be purchased at Scraps and the city
New Transparent Raster Layer 700x700
open element 49 copy and paste as new layer
resize down 2 times by 80%
open your tube place as desired
Move below the frame and erase all parts on the outside
add a luminace legacy
Open paper 2 copy and paste as new layer
Resize down if desired and move below the tube layer
erase all parts on the outside
open the tube again copy and paste as new layer
resize down 1 time by 80% and move above all other layers
Duplicate the frame layer and move above the tube layer
Erase parts of the tube below the frame
Hide the duplicated frame layer and with your tube layer highlighted
Grab your magic wand click on parts of the blue when u see the marching ants
where you want them go to selections, Modifity and Feather by 4
Do this with as much of the blue as u want to remove
I kept a good bit if it near the bottom.
unhide the frame layer and erase all parts covering the tube
open element 51 copy and paste as new layer
resize down 1 time by 80% and move below all other layers bottom centered
open element 59 copy and paste as new layer
resize down by 80% about 1 time place to the bottom above all other layers
Duplicate and Mirror
Open element 16 copy and paste as new layer
Resize down by 80% and move to the right of the tube
place below the sand and erase parts of the frame and trees if needed
Open element 80 copy and paste as new layer
Move to the bottom and above the tube layer
below the frame later
erase all unwanted parts
Open element 75 copy and paste as new layer
Place to the left, duplicate and mirror to the right
Merge down and move below element 80
you can move element 80 down more if needed just erase any extra unwanted
open element 47 Copy and paste as new layer
resize down 1 time by 80% and move below the tube layer to the bottom right
Move below the trees too ( you may need to hide all extra elements )
open element 50 copy and paste as new layer
resize down by80% about 2 times and move above all other layers covering her boobs
Duplicate and hide for now
Open element 50 again copy and paste as new layer
Move to the bottom left above all other layers
Duplicate Mirror and move to the right
above all other layers
unhide the duplicate layer and free rotate by 20% to the right and place above the larger starfish on the left
Duplicate again, mirror and move to the right
open element 62 copy and paste and new layer
Move to the left below the star fish
Resize down by 80% 1 time
erase all parts if below the star fish
open element 46 copy and paste as new layer
resize down 1 time by 80% and place in the center between the starfish
open element 61 copy and paste as new layer
Mirror and resize down by 80% about 3 times
move below the smaller starfish on the left
open element 83 copy and paste as new layer
resize down 3 times by 80% and move center left below element 61
open element 81 copy and paste as new layer
resize down as desired and place on the top left of the frame below the tube layer
open element 96 copy and paste as new layer
resize down as desired and move to the top right above the starfish on the right
open element 53 copy and paste as new layer
resize down 1 time by 80%
Move to the center below all the starfish layers
you may need to resize 1 more time if needed
Open element 69 copy and paste as new layer
resize down as desired and move to the right of the mp3 player covering the one side
should be directly above the mp3 player
open element 94 copy and paste as new layer
resize down 2 times by 80% and move to the bottom above the glass and mp3 player
This needs to be above the right starfish
add your name copyright and save
Pay to Use Scrap Kit Just Beachy by Bibi's Collection
Both can be purchased at Scraps and the city
New Transparent Raster Layer 700x700
open element 49 copy and paste as new layer
resize down 2 times by 80%
open your tube place as desired
Move below the frame and erase all parts on the outside
add a luminace legacy
Open paper 2 copy and paste as new layer
Resize down if desired and move below the tube layer
erase all parts on the outside
open the tube again copy and paste as new layer
resize down 1 time by 80% and move above all other layers
Duplicate the frame layer and move above the tube layer
Erase parts of the tube below the frame
Hide the duplicated frame layer and with your tube layer highlighted
Grab your magic wand click on parts of the blue when u see the marching ants
where you want them go to selections, Modifity and Feather by 4
Do this with as much of the blue as u want to remove
I kept a good bit if it near the bottom.
unhide the frame layer and erase all parts covering the tube
open element 51 copy and paste as new layer
resize down 1 time by 80% and move below all other layers bottom centered
open element 59 copy and paste as new layer
resize down by 80% about 1 time place to the bottom above all other layers
Duplicate and Mirror
Open element 16 copy and paste as new layer
Resize down by 80% and move to the right of the tube
place below the sand and erase parts of the frame and trees if needed
Open element 80 copy and paste as new layer
Move to the bottom and above the tube layer
below the frame later
erase all unwanted parts
Open element 75 copy and paste as new layer
Place to the left, duplicate and mirror to the right
Merge down and move below element 80
you can move element 80 down more if needed just erase any extra unwanted
open element 47 Copy and paste as new layer
resize down 1 time by 80% and move below the tube layer to the bottom right
Move below the trees too ( you may need to hide all extra elements )
open element 50 copy and paste as new layer
resize down by80% about 2 times and move above all other layers covering her boobs
Duplicate and hide for now
Open element 50 again copy and paste as new layer
Move to the bottom left above all other layers
Duplicate Mirror and move to the right
above all other layers
unhide the duplicate layer and free rotate by 20% to the right and place above the larger starfish on the left
Duplicate again, mirror and move to the right
open element 62 copy and paste and new layer
Move to the left below the star fish
Resize down by 80% 1 time
erase all parts if below the star fish
open element 46 copy and paste as new layer
resize down 1 time by 80% and place in the center between the starfish
open element 61 copy and paste as new layer
Mirror and resize down by 80% about 3 times
move below the smaller starfish on the left
open element 83 copy and paste as new layer
resize down 3 times by 80% and move center left below element 61
open element 81 copy and paste as new layer
resize down as desired and place on the top left of the frame below the tube layer
open element 96 copy and paste as new layer
resize down as desired and move to the top right above the starfish on the right
open element 53 copy and paste as new layer
resize down 1 time by 80%
Move to the center below all the starfish layers
you may need to resize 1 more time if needed
Open element 69 copy and paste as new layer
resize down as desired and move to the right of the mp3 player covering the one side
should be directly above the mp3 player
open element 94 copy and paste as new layer
resize down 2 times by 80% and move to the bottom above the glass and mp3 player
This needs to be above the right starfish
add your name copyright and save
Monday, July 8, 2013

Artwork is Tiffany by Ninaste
Matching Pay to Use Scrap Kit by Disturbed Scraps by Gaby
You can purchase both from Scraps and the City
New Transparent Rater Layer 700x700
open element 129 copy and paste as new layer
resize down 2 times by 80%
paper 2 copy and paste as new layer
Move below all other layers and erase parts on the outside of the frame
Open the tube copy and paste as new layer
resize down about 2 times by 80%
Mirror and move to the left
duplicate the frame layer and move above the tube
Erase the lower part of the tube on the outside of the frame
erase the part of the frame covering the rest of the frame
Open element 56 copy and paste as new layer
resize down 1 time by 80%
Mirror and move above the paper layer
Erase all parts on the outside
open element 105 copy and paste as new layer
resize down 1 time by 80%
Move below all other layers
to the bottom
Open element 21 copy and paste as new layer
resize down about 3 times by 80% and move above all other layers
to the bottom
open element 73 copy and paste as new layer
mirror and move to the right
resize down about 3 times by 80% and move above all other layers
open element 4 copy and paste as new layer
Resize down by 80% 5 times and move below element 73
to the left above all other layers
open element 50 copy and paste as new layer
resize down 2 times by 60% mirror and move to the right below element 73
Duplicate and mirror, Move below the original and slightly up higher
Open element 108 copy and paste as new layer
resize down 3 times by 60% and move directly above element 56
Duplicate your tube layer and move below the original frame and
erase all parts on the outside, add a luminance legacy
Add name copyright and save
Monday, June 17, 2013

Both can be purchased at Scraps and the City
Mask of Choice I am using Sparkle Mask 5 by Sue from the Misfits Creations
New Transparent Raster layer 650 x 650
Open element 70 copy and paste as new layer
Resize down 2 times by 80% placing in the center
Open paper 9 copy and paste as new layer
resize down 3 times by 80%
Move below element 70
Erase all parts on the outside
Open your tube copy and paste as new layer
resize down 2 times by 80%
Place as desired in the center areas of the frame
and erase all parts on the outside
Paste your tube once again
Resize down by 80% 2 times and move above all other layers
Open element 61 copy and paste as new layer
resize down 1 time by 80% move to the bottom above all other layers
Duplicate and Mirror, Merge and Duplicate again
Open paper 3 copy and paste as new layer
Move below all other images
resize down 3 times by 80%, Open your mask
Go to Layer, New mask layer, From image
select from drop down and hit ok.
Merge group
Open element 30 copy and paste as new layer
resize down 1 time by 80%
move to the right directly below the tube layer
open element 82 copy and paste as new layer
resize down 3 times by 80% and move to the left directly below the tube layer
open element 87 Copy and paste as new layer
Resize down 2 times by 60% and move to the right above
element 30
open element 69 copy and paste as new layer
resize down 1 time by 60% Move to the top center
below the full tube layer
open element 29 copy and paste as new layer
resize down 2 times by 60% and move to the right above
all other layers
Open element 71 copy and paste as new layer
resize down 3 times by 60% move above all other layers
Place on the corner of element 30
Open element 25 Copy and paste as new layer
resize down 1 time by 60% and move to the bottom
placing right above element 61
open element 47 copy and paste as new layer
resize down 2 times by 60% and move above all other layers
and to the right
Add name copyright and save
Mask of Choice I am using Sparkle Mask 5 by Sue from the Misfits Creations
New Transparent Raster layer 650 x 650
Open element 70 copy and paste as new layer
Resize down 2 times by 80% placing in the center
Open paper 9 copy and paste as new layer
resize down 3 times by 80%
Move below element 70
Erase all parts on the outside
Open your tube copy and paste as new layer
resize down 2 times by 80%
Place as desired in the center areas of the frame
and erase all parts on the outside
Paste your tube once again
Resize down by 80% 2 times and move above all other layers
Open element 61 copy and paste as new layer
resize down 1 time by 80% move to the bottom above all other layers
Duplicate and Mirror, Merge and Duplicate again
Open paper 3 copy and paste as new layer
Move below all other images
resize down 3 times by 80%, Open your mask
Go to Layer, New mask layer, From image
select from drop down and hit ok.
Merge group
Open element 30 copy and paste as new layer
resize down 1 time by 80%
move to the right directly below the tube layer
open element 82 copy and paste as new layer
resize down 3 times by 80% and move to the left directly below the tube layer
open element 87 Copy and paste as new layer
Resize down 2 times by 60% and move to the right above
element 30
open element 69 copy and paste as new layer
resize down 1 time by 60% Move to the top center
below the full tube layer
open element 29 copy and paste as new layer
resize down 2 times by 60% and move to the right above
all other layers
Open element 71 copy and paste as new layer
resize down 3 times by 60% move above all other layers
Place on the corner of element 30
Open element 25 Copy and paste as new layer
resize down 1 time by 60% and move to the bottom
placing right above element 61
open element 47 copy and paste as new layer
resize down 2 times by 60% and move above all other layers
and to the right
Add name copyright and save
Subscribe to:
Posts
(Atom)
STAMPS


